Sunday, January 1, 2017
Disable Google Chrome Built in Spell Checker
Disable Google Chrome Built in Spell Checker
Disable Google Chrome Built-in Spell Checker?
step-by-step method to disable Chrome spell-checker:
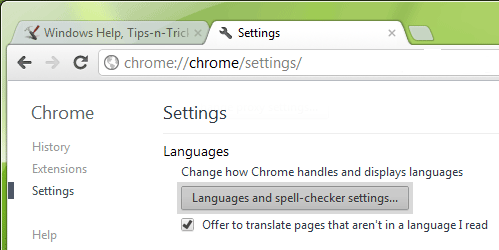
1. Open Google Chrome and click on Settings button present at the end of the toolbar. Now select Settings menu item.
2. Click on "Show advanced settings..." link given at the bottom of Settings page.
3. Now scroll down a little and click on "Languages and spell-checker settings..." button present in "Languages" section.
4. Itll open a new window where youll see a checkbox "Enable spell checking". Uncheck the option and click on OK button.
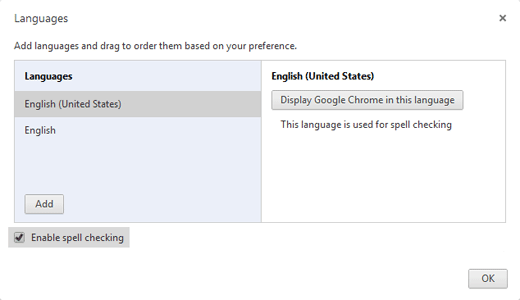
5. Thats it. Itll turn spell-check feature off.
step-by-step method to disable Chrome spell-checker:
1. Open Google Chrome and click on Settings button present at the end of the toolbar. Now select Settings menu item.
2. Click on "Show advanced settings..." link given at the bottom of Settings page.
3. Now scroll down a little and click on "Languages and spell-checker settings..." button present in "Languages" section.
4. Itll open a new window where youll see a checkbox "Enable spell checking". Uncheck the option and click on OK button.
5. Thats it. Itll turn spell-check feature off.
--------------------------------------------------------------------------------------------------------
Professional technology support is now just a call away. Get comprehensive tech support from setup and installation to diagnosis and repair to security and optimization only at Techvedic. Device origin – No bar, warranty period – No bar. Enjoy unlimited tech support at affordable prices. To speak with our experts, dial 0800 016 3909 (Toll Free).
About Techvedic: http://en.wikipedia.org/wiki/Techvedic
Get in touch with Techvedic on Social Media:
Techvedic Facebook Page: https://www.facebook.com/techvedic
Techvedic Twitter: https://twitter.com/techvedic
Techvedic Google Plus Page: https://plus.google.com/+TechvedicInc/posts
Techvedic YouTube:https://www.youtube.com/user/Techvedic
Techvedic LinkedIn Profile:https://www.linkedin.com/company/techvedic
Visit: Techvedic - Computer Tech Support Company | http://www.techvedic.co.uk/ | 0800 016 3909 (UK) | support@techvedic.com
Available link for download
Cara Pasang CWM dan ROOT Pada Samsung Galaxy Note 1 GT N7000
Cara Pasang CWM dan ROOT Pada Samsung Galaxy Note 1 GT N7000

Siang yang cerah ini saya mau share tentang Cara Pasang CWM dan ROOT Pada Samsung Galaxy Note 1 GT-N7000, menurut saya untuk ponsel yang satu ini memasang CWM dan Rooting nya lumayan agak ribet, namun jangan kuatir karna disini saya membagikan sekaligus dengan screenshoot atau gamnar saat melakukan proses pasang cwm dan rooting. Sebenarnya CWM itu sudah ada dalam setiap android namun fiturnya belum lengkap karna belum adanya fitur advace untuk backup atau restore OS android, dan masih banyak lagi kekurangan dari CWM bawaan ini.
Ok langsung saja tanpa banyak basa basi lagi kita simak tutorialnya dibawah ini, sebelum itu kita baca bissmillah dulu.
Siapkan dulu alat yang akan kita gunakan
- CWM Recovery Samsung Galaxy Note 1 Download
- CWM Recovery Samsung Jelly bean untuk Firmware DXLSE Galaxy Note 1 Download
- ROOT Package Download
- Driver USB Samsung Download
- Odin Download
- Kabel Data
- Laptop atau Komputer
Langkah Pasang CWM Pada Galaxy Note 1 GT-N7000
1. Extract dan Install Driver USB Samsung
2. Extract dan Install Odin terus anda buka
3. Dalam keadaan hp mati masuk ke download mode dengan menekan tombol Vol Down + Home + Power secara bersamaan.
4. Jika sudah masuk menu warning ada 2 pilihan disana yaitu "Continue" dan "Cancel" anda pilih Continue aja dengan menekan tombol Vol Up

6. Jika sudah tersambung maka di aplikasi odin ada tulisan ADD
7. Kemudian masukan ClockWorkMod.tar.md5 dengan cara Klik PDA lalu cari file ClockWorkMod.tar.md5 yang kalian tadi extract
8. Selanjutnya centang Auto reboot dan F.Reset time
9. Jika langkah langkah diatas sudah dilakukan dengan benar dan seperti gambar dibawah ini maka pilih Star

11. Setelah Proses Selesai maka hp anda akan restar secara otomatis dan dalam proses booting akan memakan waktu 3-5 menit jadi harus bersabar sejenak.
12. Selesai, Selamat hp anda bisa digunakan kembali dan tidak error atau hank lagi
Tutorial Cara Root Samsung Galaxy Note 1 GT-N7000
- Pindahkan Root Package Galaxy Note DXLSE.zip ke sdcard "usahakan diluar folder"
- Dalam keadaan mati masuk mode recovery dengan menekan tombol Home+Power+volume atas secara bersamaan.
- Sebelum installasi Root Package Galaxy Note DXLSE.zip sebaiknya backup data terlebih dahulu, dengan cara memilih backup and restore > backup.
- Pilih install zip > from sdcard
- Pilih Root Package Galaxy Note DXLSE.zip lalu pilih yes install - Root Package Galaxy Note DXLSE.zip dan tunggu proses install hingga selesai.
- Kembali ke menu utama pilih reboot system now.
- Selasai
Jika anda bingung dalam kata-kata diatas, anda bisa lihat struktur gambar dibawah

Baca Juga : Tutorial Cara Mengatasi Bootloop Pada Samsung Galaxy Note 1 GT-N7000
Available link for download
Easy Wipe Rom A13 10 Chipset
Easy Wipe Rom A13 10 Chipset

Lenovo mengklaim telah kembali duduki peringkat ke tiga di tingkat pasar smartphone global mengalahkan Xiaomi. Peringkat tersebut didapat Lenovo berkat akuisisi Motorola yang rampung di akhir bulan Oktober 2014 kemarin.
Sebelum menggaet Motorola, Lenovo hanya memiliki pangsa pasar sebesar 5,2%. Namun, setelah pangsa pasarnya digabung, kini Lenovo hanya berada dua peringkat di bawah Samsung dan Apple dengan jumlah persentase 7,4%.
"Dengan akuisisi Motorola tadi, Lenovo ingin lebih memperkuat pangsa pasar lagi secara global dan Indonesia," ujar Miranda Vania Warokkah, MIDH Marketing Manager Lenovo Indonesia, sesusai acara peluncuran Lenovo Vibe X2, di Hotel Pullman Jakarta.
Tampaknya Lenovo cukup puas menduduki peringkat ke tiga global dan Indonesia. Hal ini tersirat dari ucapan Miranda yang mengatakan jika Lenovo akan tetap bertahan di peringkat ke tiga.
Dengan akuisisi ini vendor asal Tiongkok tersebut berharap dapat menembus pasar smartphone di kawasan Amerika dan Eropa yang mana brand Motorola sangat diakui di pasar tersebut.
SOURCE
Available link for download
Cheat Trial Xtreme 3 Unlimited Coin and Level Unlock
Cheat Trial Xtreme 3 Unlimited Coin and Level Unlock

How to Cheat Levels & Coins in Trail Xtreme 3?
Popular game Trial Xtreme 3 a couple of days ago there was a store in Windows Phone Store. Although it is free, in a lot of elements for which you have to pay. For example, to get access to all 121 levels, you have to pay almost $ 10. This manual tells you how to unlock all the levels in the game Trial Xtreme 3 for Windows Phone for free and tweak yourself a couple thousand coins.
Steps :
You do not need to edit anything, do not dig anywhere, simply do the following:
1. Download Trial Xtreme 3.xap of our site. It is important to download it from the site and not from the store ., and Windows Phone Power Tools
2. Start the game, then quit. Click on the tab ” Isolated Storage “in the WPPT.
3. Scroll down game Trial Xtreme and expand it. Set the checkbox ” Overwrite Existing “. Then click the ” Put File “.
4. Download the file you want saved.
If you want to get all levels and 999,999 coins , download this file .
5. Unpack the files from the archives and put it in Isolated Storage.
Start the game and check the levels of open and we added a coin. Enjoy.
by:wphub
Available link for download
Desktop Gadgets Not Displayed Correctly After Upgrading to Internet Explorer 11
Desktop Gadgets Not Displayed Correctly After Upgrading to Internet Explorer 11
After installing Internet Explorer 11, some of your desktop gadgets may not render correctly. The gadgets may appear transparent with pink border and text, as in the graphic below:

And here is how it’s supposed to appear:

This has to do with a bug in Internet Explorer 11 RTM, which breaks some desktop gadgets, if the user has set custom DPI settings (>100%). In my case, gadgets stopped rendering correctly if I set the DPI to a value higher than 115%. In order to make the gadgets display correctly, you have two options.
Option 1. Revert back the DPI settings to 115%. If that doesn’t work, set it to 100%. (via Control PanelAppearance and PersonalizationDisplay)
Option 2. If you want to retain your custom DPI settings and still want gadgets to work correctly, edit the protected file gadget.xml located in the following folder:
C:Program FilesWindows SidebarGadgets
The trick is to set <autoscaleDPI> setting to false, inside the XML file. By default, the auto-scaling is enabled in the gadgets configuration, which means the Zoom feature (of Internet Explorer) scales text and images for this gadget to match the DPI settings of the current user. Since IE11 has this bug with higher DPI, disabling the automatic scaling feature for that gadget is a nice workaround.
-----------------------------------------------------------------------------------------------------------------
Improve customer experience and customer-satisfaction with our Pro Technology Support programme and stand out in the market. We have over 5 years of technical experience and have more than 1, 00, 0000 satisfied customers all across the world from the US, the UK, Canada and Australia to India. To become a partner, call us at 0800 016 3909 (Toll Free).
About Techvedic: http://en.wikipedia.org/wiki/Techvedic
Get in touch with Techvedic on Social Media:
Techvedic Facebook Page: https://www.facebook.com/techvedic
Techvedic Twitter: https://twitter.com/techvedic
Techvedic Google Plus Page: https://plus.google.com/+TechvedicInc/posts
Techvedic YouTube:https://www.youtube.com/user/Techvedic
Techvedic LinkedIn Profile:https://www.linkedin.com/company/techvedic
Visit: Techvedic - Computer Tech Support Company | http://www.techvedic.co.uk/ | 0800 016 3909 (UK) | support@techvedic.com
Available link for download
Subscribe to:
Posts (Atom)