Showing posts with label or. Show all posts
Showing posts with label or. Show all posts
Sunday, January 29, 2017
Convert MP3 Wav and Other Media Files into AAC or M4A Formats Using iTunes
Convert MP3 Wav and Other Media Files into AAC or M4A Formats Using iTunes
Convert MP3, Wav and Other Media Files into AAC or M4A Formats Using iTunes
1. First download iTunes if you dont have it:
2. Now install it and run the program. Well need to change a few options.
3. Click on "Edit -> Preferences".
4. Now go to "Advanced" tab and click on "Importing" tab.
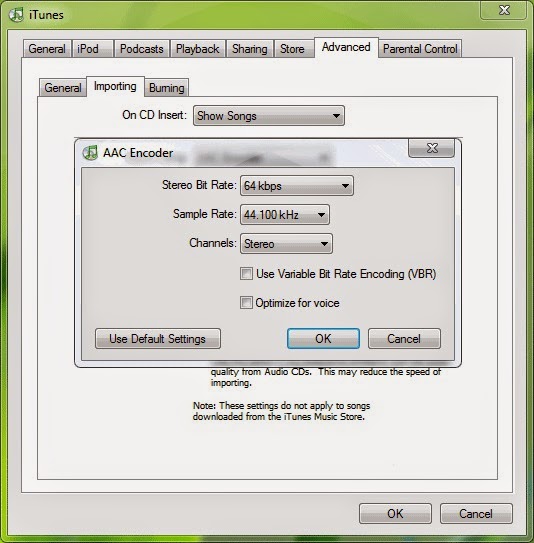
5. Select "AAC Encoder" from "Import Using" list and select "Custom" from "Setting" list. As soon as you select "Custom" option, itll show a new dialog box.
6. Select "64 kbps" as "Stereo Bit Rate", "44.100 kHz" as "Sample Rate" and "Stereo" as "Channels". These are standard values which I found best for a quality media file. You can change them according to your requirements.
.jpg)
7. Now click on OK and and again OK to exit the Preferences box.
8. Now we have customized all settings to convert files into AAC format. Now open any media file by pressing "Ctrl+O" or by selecting "File -> Add File to Library" option.
9. Itll add the file in Library window. Now right-click on the file and select "Convert Selection to AAC" option.
10. Thats it. Now sit back and wait for a few seconds. iTunes will convert the file into .M4A file which you can upload to your cell phone.
11. You can mass convert files into AAC. Open multiple files and select all of them and follow Step 9.
12. If you are wondering where is your converted file has been stored? Then go to "Edit -> Preferences" and click on "Advanced" tab.
It shows the folder location where iTunes will store the music files. You can change it using "Change" button.
-------------------------------------------------------------------------------------------------------------------
1. First download iTunes if you dont have it:
2. Now install it and run the program. Well need to change a few options.
3. Click on "Edit -> Preferences".
4. Now go to "Advanced" tab and click on "Importing" tab.
5. Select "AAC Encoder" from "Import Using" list and select "Custom" from "Setting" list. As soon as you select "Custom" option, itll show a new dialog box.
6. Select "64 kbps" as "Stereo Bit Rate", "44.100 kHz" as "Sample Rate" and "Stereo" as "Channels". These are standard values which I found best for a quality media file. You can change them according to your requirements.
7. Now click on OK and and again OK to exit the Preferences box.
8. Now we have customized all settings to convert files into AAC format. Now open any media file by pressing "Ctrl+O" or by selecting "File -> Add File to Library" option.
9. Itll add the file in Library window. Now right-click on the file and select "Convert Selection to AAC" option.
10. Thats it. Now sit back and wait for a few seconds. iTunes will convert the file into .M4A file which you can upload to your cell phone.
11. You can mass convert files into AAC. Open multiple files and select all of them and follow Step 9.
12. If you are wondering where is your converted file has been stored? Then go to "Edit -> Preferences" and click on "Advanced" tab.
It shows the folder location where iTunes will store the music files. You can change it using "Change" button.
-------------------------------------------------------------------------------------------------------------------
Not happy with your TV performance? Call at 0800 016 3909 (Freephone) to seek suggestions of TV calibration experts from Techvedic. We are not restrained by product make or model. And neither with the warranty period. Hence, feel free to get in touch with us to derive the best experience from your technology product.
About Techvedic: http://en.wikipedia.org/wiki/Techvedic
Get in touch with Techvedic on Social Media:
Techvedic Facebook Page: https://www.facebook.com/techvedic
Techvedic Twitter: https://twitter.com/techvedic
Techvedic Google Plus Page: https://plus.google.com/+TechvedicInc/posts
Techvedic YouTube:https://www.youtube.com/user/Techvedic
Techvedic LinkedIn Profile:https://www.linkedin.com/company/techvedic
Visit: Techvedic - Computer Tech Support Company | http://www.techvedic.co.uk/ | 0800 016 3909 (UK) | support@techvedic.com
Available link for download
Tuesday, September 27, 2016
Copy Erase Edit or Translate the texts within images using Google Chrome
Copy Erase Edit or Translate the texts within images using Google Chrome
Erase the Text from Images.
To erase the text from an image, just select the desired text and in right click context menu select the Erase Text Option from Translate main menu. The Plugin intelligently captures the colours from the areas around the text and fills the gaps of deleted letters.

The extension uses various technologies, including algorithms OCR (Optical Character Recognition) and Microsoft, Google libraries to identify the characters of different alphabets in almost all images analyzed.
A problem with the extension is that it can not identify all texts of an image, and even selectable can sometimes be interpreted in the wrong way. For example in the above shown sample image, the application failed to erase the Texts 800 Km, and 1200 Km. Moreover the plugin doesn’t support the vertically arranged texts.
The programmer and brain behind the extension Kevin Kwok says that, the plugin will shortly receive new updates to fix these flaws and a version for Mozilla Firefox . You can download the Project Naptha Plugin from Google Chrome Store .
-----------------------------------------------------------------------------------------------------
To erase the text from an image, just select the desired text and in right click context menu select the Erase Text Option from Translate main menu. The Plugin intelligently captures the colours from the areas around the text and fills the gaps of deleted letters.
The extension uses various technologies, including algorithms OCR (Optical Character Recognition) and Microsoft, Google libraries to identify the characters of different alphabets in almost all images analyzed.
A problem with the extension is that it can not identify all texts of an image, and even selectable can sometimes be interpreted in the wrong way. For example in the above shown sample image, the application failed to erase the Texts 800 Km, and 1200 Km. Moreover the plugin doesn’t support the vertically arranged texts.
The programmer and brain behind the extension Kevin Kwok says that, the plugin will shortly receive new updates to fix these flaws and a version for Mozilla Firefox . You can download the Project Naptha Plugin from Google Chrome Store .
-----------------------------------------------------------------------------------------------------
Empower your people in sales, marketing and customer service to serve customers efficiently with effective collaboration and drive business growth. Techvedic brings industry-compliant cloud-based Customer Relationship Management (CRM) solution for startups, small and medium businesses and contact centers.
About Techvedic: http://en.wikipedia.org/wiki/Techvedic
Get in touch with Techvedic on Social Media:
Techvedic Facebook Page: https://www.facebook.com/techvedic
Techvedic Twitter :https://twitter.com/techvedic
Techvedic Google Plus Page: https://plus.google.com/+TechvedicInc/posts
Techvedic Youtube:https://www.youtube.com/user/Techvedic
Techvedic Linkidin Profile: https://www.linkedin.com/company/techvedic
Visit: Techvedic - Computer Tech Support Company | http://www.techvedic.co.uk/ | 0800 016 3909 (UK) | support@techvedic.com
Available link for download
Friday, September 2, 2016
Easy And Best Methods to Make Money with a Blog or Word press
Easy And Best Methods to Make Money with a Blog or Word press
Easy And Best Methods to Make Money with a Blog or Word press

Google AdSense -Google AdSense is considered as one of the best advertising network or monetization program for bloggers to monetize their blog to make good revenue. In order to get approved from AdSense, you should be having good quality blog with some traffic. If you are fulfilling these conditions, then you should need to apply for account on adsense.com
Display Banner Ads- Display Banner Ads Another good idea to monetize your website is through displaying advertisements. If you are having good authority website or blog with decent traffic and good rankings then advertisers or companies will contact you and ask for banner advertisements on your blog. You can charge them good amount of your desire that you will receive from them for displaying banner advertisement for specific time period. The best example is BuySellAds.com which is known as best marketplace in online world for buying and selling ads network. So you can expect some good earnings from such networks but for approval it is highly recommended for you to have a blog on specific niche/topic for easily approval.
Write about Products- Write about Products another good idea to make money from your blog is to find out products relevant to your niche and contact their companies for paid reviews. If you have some blog with good rankings and authority and you are good in pitching advertisers, it should be recommended for you to try out this method for good income.
Available link for download
Subscribe to:
Posts (Atom)